
Introduction
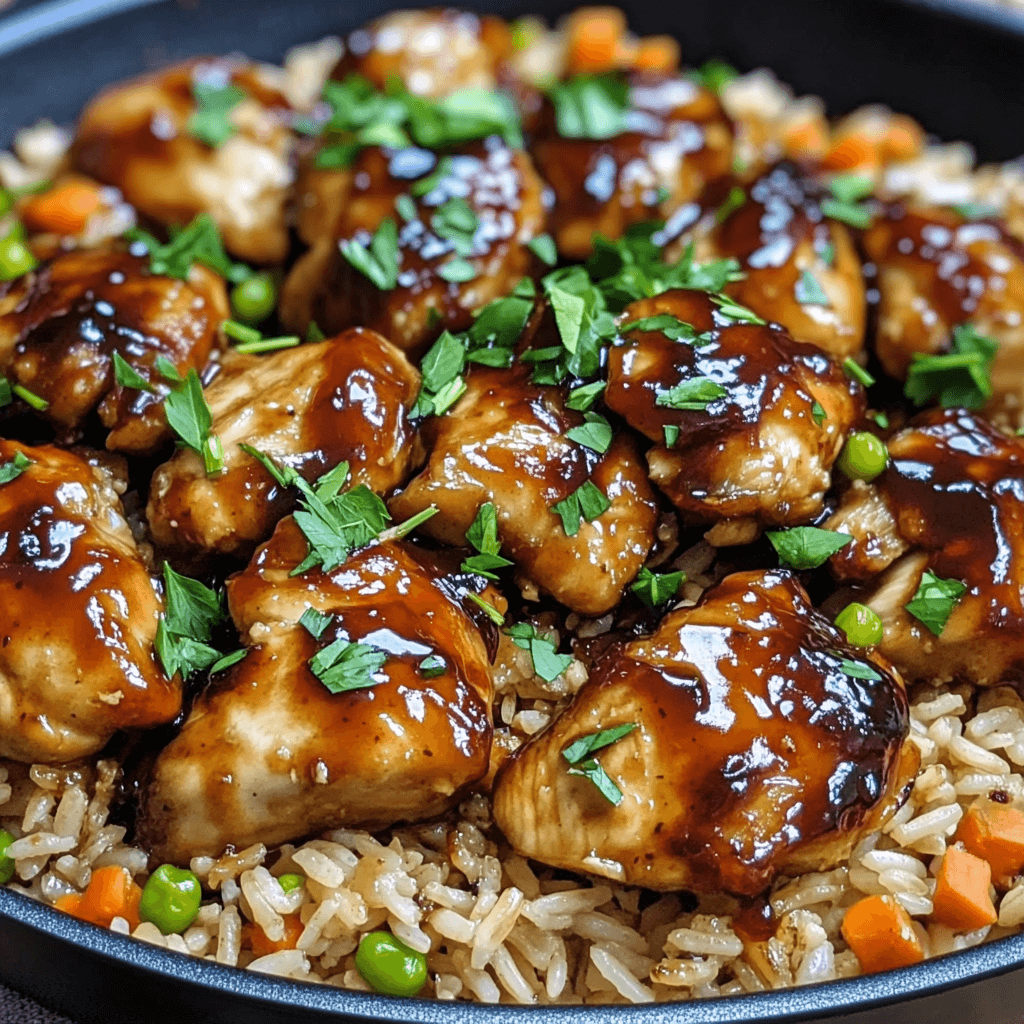
Looking for a delicious, satisfying meal that comes together with minimal effort? One-Skillet Honey BBQ Chicken & Rice is a flavorful, quick, and easy-to-make dish that blends tender chicken, sweet and smoky honey BBQ sauce, and perfectly cooked rice—all in a single pan. It’s a comforting, home-style dinner ideal for families or solo weeknight meals.
This one-pan chicken recipe is growing in popularity thanks to:
- Minimal cleanup – just one skillet to wash
- Time-saving prep – done in under 40 minutes
- Versatility – easily adaptable with your favorite veggies or protein
The simplicity of one-skillet meals makes them a favorite for busy home cooks. With hundreds of variations like this dish, they’re becoming a cornerstone of modern home cooking.
Why Choose One-Skillet Meals?
One-skillet meals have become a favorite in kitchens everywhere—and for good reason. They offer an unbeatable combination of simplicity, speed, and flavor. With everything cooked in a single pan, you not only save time during preparation, but also avoid the pile of dishes that usually follows a delicious meal.
Here’s why so many people love one-pan dinners:
- Quick cleanup – one pan means fewer dishes to wash
- Time-saving – great for busy weeknights or meal prepping
- Flavorful results – ingredients cook together and infuse each other with bold taste
Essential Ingredients
The beauty of One-Skillet Honey BBQ Chicken & Rice lies in its simple, everyday ingredients that create deep, comforting flavor. Each component plays a key role in building the dish’s taste and texture.

Here’s a breakdown of what you’ll need:
- Protein: Use boneless, skinless chicken thighs for juicy tenderness or opt for chicken breasts if you prefer a leaner option. Either one works well depending on your texture and fat preference.
- Grain: Long-grain white rice is classic for this dish, as it cooks evenly and absorbs the sauce beautifully. For a healthier twist, try using brown rice, but note that it may require a longer cook time.
- Sauce: The signature flavor comes from a mix of BBQ sauce—choose mesquite or hickory for smoky depth—and honey for a touch of sweetness.
- Vegetables: Frozen or fresh mixed vegetables like peas, carrots, corn, or bell peppers add both color and nutrition. This combo turns the dish into a complete, balanced meal.
- Seasonings: Garlic powder, onion powder, smoked paprika, salt, and black pepper are pantry staples that deliver bold seasoning with minimal effort.
- Liquids: Chicken broth keeps everything moist and infuses the rice with savory depth. It also helps deglaze the pan and carry flavor throughout.
- Garnish: Finish with freshly chopped green onions or parsley for a bright, herbal contrast to the smoky-sweet base.
These ingredients are common in many home kitchens, making this recipe both budget-friendly and weeknight-ready.
Step-by-Step Guide to Honey BBQ Chicken and Rice in One Skillet
Making One-Skillet Honey BBQ Chicken & Rice is incredibly simple once everything is prepped. This method ensures that each layer of flavor builds on the last, resulting in a rich, satisfying meal the whole family will love.
Before you start, make sure your ingredients are prepped and within reach. Having a clear cooking process saves time and helps avoid mistakes during busy weeknight meals.

Preparation
- Cut the chicken into evenly sized, bite-sized pieces to ensure they cook uniformly.
- Rinse the rice under cold water until it runs clear, then drain well. This removes excess starch and prevents sticking.
- Measure out your BBQ sauce, honey, chicken broth, and seasonings so you’re ready to move smoothly through the recipe.
Cooking
- Heat a bit of oil in your skillet over medium-high heat. Add the seasoned chicken and sear until golden brown on all sides. Remove and set aside. This step locks in moisture and adds a deep, roasted flavor.
- In the same pan, add the rinsed rice and sprinkle in your garlic powder, onion powder, smoked paprika, salt, and pepper. Stir for 1–2 minutes to lightly toast the rice and bloom the spices.
- Pour in the chicken broth to deglaze the skillet. Use a wooden spoon to scrape up any browned bits stuck to the bottom. These bits are full of umami and add depth to the dish.
- Stir in the BBQ sauce and honey, creating a sweet and smoky sauce that will coat the rice and chicken evenly.
- Return the chicken to the skillet, nestling each piece into the rice mixture. This helps the meat absorb surrounding flavors as it simmers.
- Cover the skillet and reduce heat to low. Let everything cook gently for 15 minutes.
- Add the vegetables (frozen or fresh), stir lightly, cover again, and cook for another 5 minutes until the rice is tender and the veggies are heated through.
- Turn off the heat and let the dish rest, covered, for 5 more minutes. This final step helps the rice fully absorb the liquid and sets the texture.
By following these steps, you’ll create a meal that’s rich in flavor, easy to clean up, and sure to become a repeat favorite.
Tips for Making the Best Easy BBQ Chicken Skillet Meal
PrintBlackberry Cinnamon Cake
- Total Time: 35 minutes
Description
Enjoy a hearty, crowd-pleasing dinner with this easy One-Skillet Honey BBQ Chicken & Rice. Tender chicken, fluffy rice, and a sweet-smoky BBQ sauce come together in one pan for a delicious meal with minimal cleanup.
Ingredients
- 1 lb (450g) boneless, skinless chicken thighs, cut into bite-sized pieces
- 1 cup long-grain white rice, rinsed
- 1 ½ cups chicken broth
- ½ cup BBQ sauce (mesquite or hickory)
- 2 tbsp honey
- 1 cup frozen mixed vegetables (peas, carrots, corn)
- 1 tsp garlic powder
- 1 tsp onion powder
- 1 tsp smoked paprika
- Salt and black pepper to taste
- Optional: Fresh chopped green onions for garnish
Instructions
- Sear Chicken: Heat a drizzle of oil in a large skillet over medium-high heat. Add seasoned chicken pieces and sear until golden brown. Remove and set aside.
- Toast Rice: In the same skillet, add the rinsed rice and dry spices. Stir for 1–2 minutes to toast slightly.
- Deglaze & Mix: Pour in the chicken broth, scraping the bottom of the pan. Stir in the BBQ sauce and honey.
- Simmer: Return the chicken to the skillet, nestling it into the rice. Cover with a lid, reduce heat to low, and simmer for 15 minutes.
- Add Veggies: Stir in the frozen vegetables, cover again, and cook for another 5 minutes until rice is tender.
- Rest: Remove from heat and let it rest, covered, for 5 minutes. Garnish with green onions and serve.
- Prep Time: 10 minutes
- Cook Time: 25 minutes
- Category: Dinner / One-Skillet Meal
Nutrition
- Serving Size: 4 servings
Getting the best flavor and texture from your One-Skillet Honey BBQ Chicken & Rice comes down to a few expert cooking techniques. These small adjustments can make a big difference in your final dish.
To start, always use a heavy-bottomed skillet. It ensures even heat distribution, preventing hot spots that can cause burning or uneven cooking. Cast iron or stainless steel are excellent options.
If you’re using rice straight from the bag, don’t skip the rinse! Washing the rice removes excess starch, which helps prevent clumping and keeps the grains separate.
When using brown rice or other whole grains, you’ll need to adjust your liquid ratios and cooking times. Brown rice absorbs more moisture and takes longer to cook, so increase the broth slightly and give it more simmer time.
Finally, always taste and adjust your seasoning before serving. A pinch of salt or a dash of smoked paprika at the end can elevate the entire flavor profile.
Recipe Variations
One of the best aspects of One-Skillet Honey BBQ Chicken & Rice is how easily it adapts to different tastes, diets, and pantry staples. These variations allow you to enjoy the same delicious base while switching things up to keep meals exciting.
If you’re looking to change the protein, try ground turkey, shredded rotisserie chicken, or even tofu for a vegetarian option. Tofu soaks up the smoky-sweet sauce beautifully when pan-seared first.
For a low-carb twist, replace white rice with cauliflower rice or quinoa. These alternatives not only cut carbs but also increase fiber and nutrients.
Switch up the vegetables based on season or preference. Add zucchini, mushrooms, or fresh spinach for extra texture and nutrients.
Craving heat? Toss in some jalapeños or a pinch of red pepper flakes.
And don’t forget the sauce. Try different BBQ sauce flavors like chipotle, bourbon, or even add a splash of soy sauce for extra umami depth.
Serving Suggestions
Once your One-Skillet Honey BBQ Chicken & Rice is ready, the right sides and garnishes can elevate it into a complete and satisfying meal. Whether you’re serving it on a busy weeknight or for casual entertaining, these ideas will round out your plate perfectly.
For a refreshing contrast, pair the dish with a crisp green salad or creamy coleslaw. Both offer a crunchy texture that complements the warm, savory skillet meal.
Add a slice of crusty bread to soak up the sweet and smoky sauce. The bread acts as a perfect mop for the flavorful juices left in the pan.
Top everything off with a sprinkle of fresh herbs like parsley or green onions to enhance both flavor and presentation. It adds a vibrant touch that makes the dish even more inviting.
Storage and Reheating Tips
Proper storage and reheating help maintain the flavor and texture of your One-Skillet Honey BBQ Chicken & Rice, making it ideal for meal prep or leftovers.
- Storage: Keep any leftovers in an airtight container and store in the refrigerator for up to 4 days. Make sure the dish cools completely before sealing to avoid excess moisture buildup.
- Reheating: Warm leftovers in a skillet over medium heat, adding a splash of broth or water to prevent drying out. This method helps retain the original texture better than the microwave.
- Freezing: Freeze individual or family-sized portions in freezer-safe containers for up to 3 months. Be sure to label the date. For the safest results, always thaw overnight in the refrigerator before reheating.
Frequently Asked Questions (FAQs)
Here are the answers to some of the most common questions about making One-Skillet Honey BBQ Chicken & Rice—perfect for ensuring success every time you cook this delicious meal.
Can I use chicken breasts instead of thighs?
- Yes, you can substitute chicken thighs with chicken breasts if you prefer a leaner cut.
- However, monitor the cooking time closely, as chicken breasts tend to dry out faster than thighs.
What kind of BBQ sauce works best?
- Look for a BBQ sauce with a good balance of sweetness and smokiness.
- Mesquite or hickory-flavored sauces are popular choices for this dish.
Why is my rice undercooked or too wet?
- Make sure the skillet is tightly covered during the simmering process to trap the steam properly.
- Adjust liquid ratios and cooking time depending on the type of rice used. Brown rice requires more liquid and time compared to white rice.
Can I make this dish ahead of time?
- Absolutely. This dish is meal-prep friendly.
- Simply cook as directed, let it cool, and store in the fridge or freeze in portions. Reheat gently on the stovetop or in the microwave with a splash of broth to refresh moisture.
Is this recipe gluten-free?
- The recipe can be gluten-free if you use a certified gluten-free BBQ sauce and gluten-free chicken broth.
- Always check labels carefully to ensure compliance with dietary needs.
Conclusion
One-Skillet Honey BBQ Chicken & Rice is a delicious, easy-to-make, and versatile meal perfect for busy weeknights or meal prepping. This dish combines tender chicken, sweet and smoky honey BBQ sauce, and flavorful rice cooked all in one pan for minimal cleanup and maximum taste.
- It’s a great way to enjoy a balanced meal with protein, grains, and vegetables.
- The recipe is highly adaptable with options for different proteins, grains, and spice levels.
- With the tips and variations shared, you can customize this recipe to suit your taste and dietary needs.
Give this recipe a try, and you’ll have a quick, satisfying, and crowd-pleasing dish ready in no time!